Bulk Entry
Bulk Entry is a full-screen workflow for entering asset values across all platforms in a single session. It's the default way to create a new snapshot, and it's designed to make monthly portfolio updates fast and efficient.
Opening Bulk Entry
- Navigate to Portfolio > Snapshots in the sidebar.
- Click the + button in the toolbar or press Cmd+N.
- Choose a date for the snapshot.
- Select Bulk Entry as the creation mode (this is the default).
- Click Create.
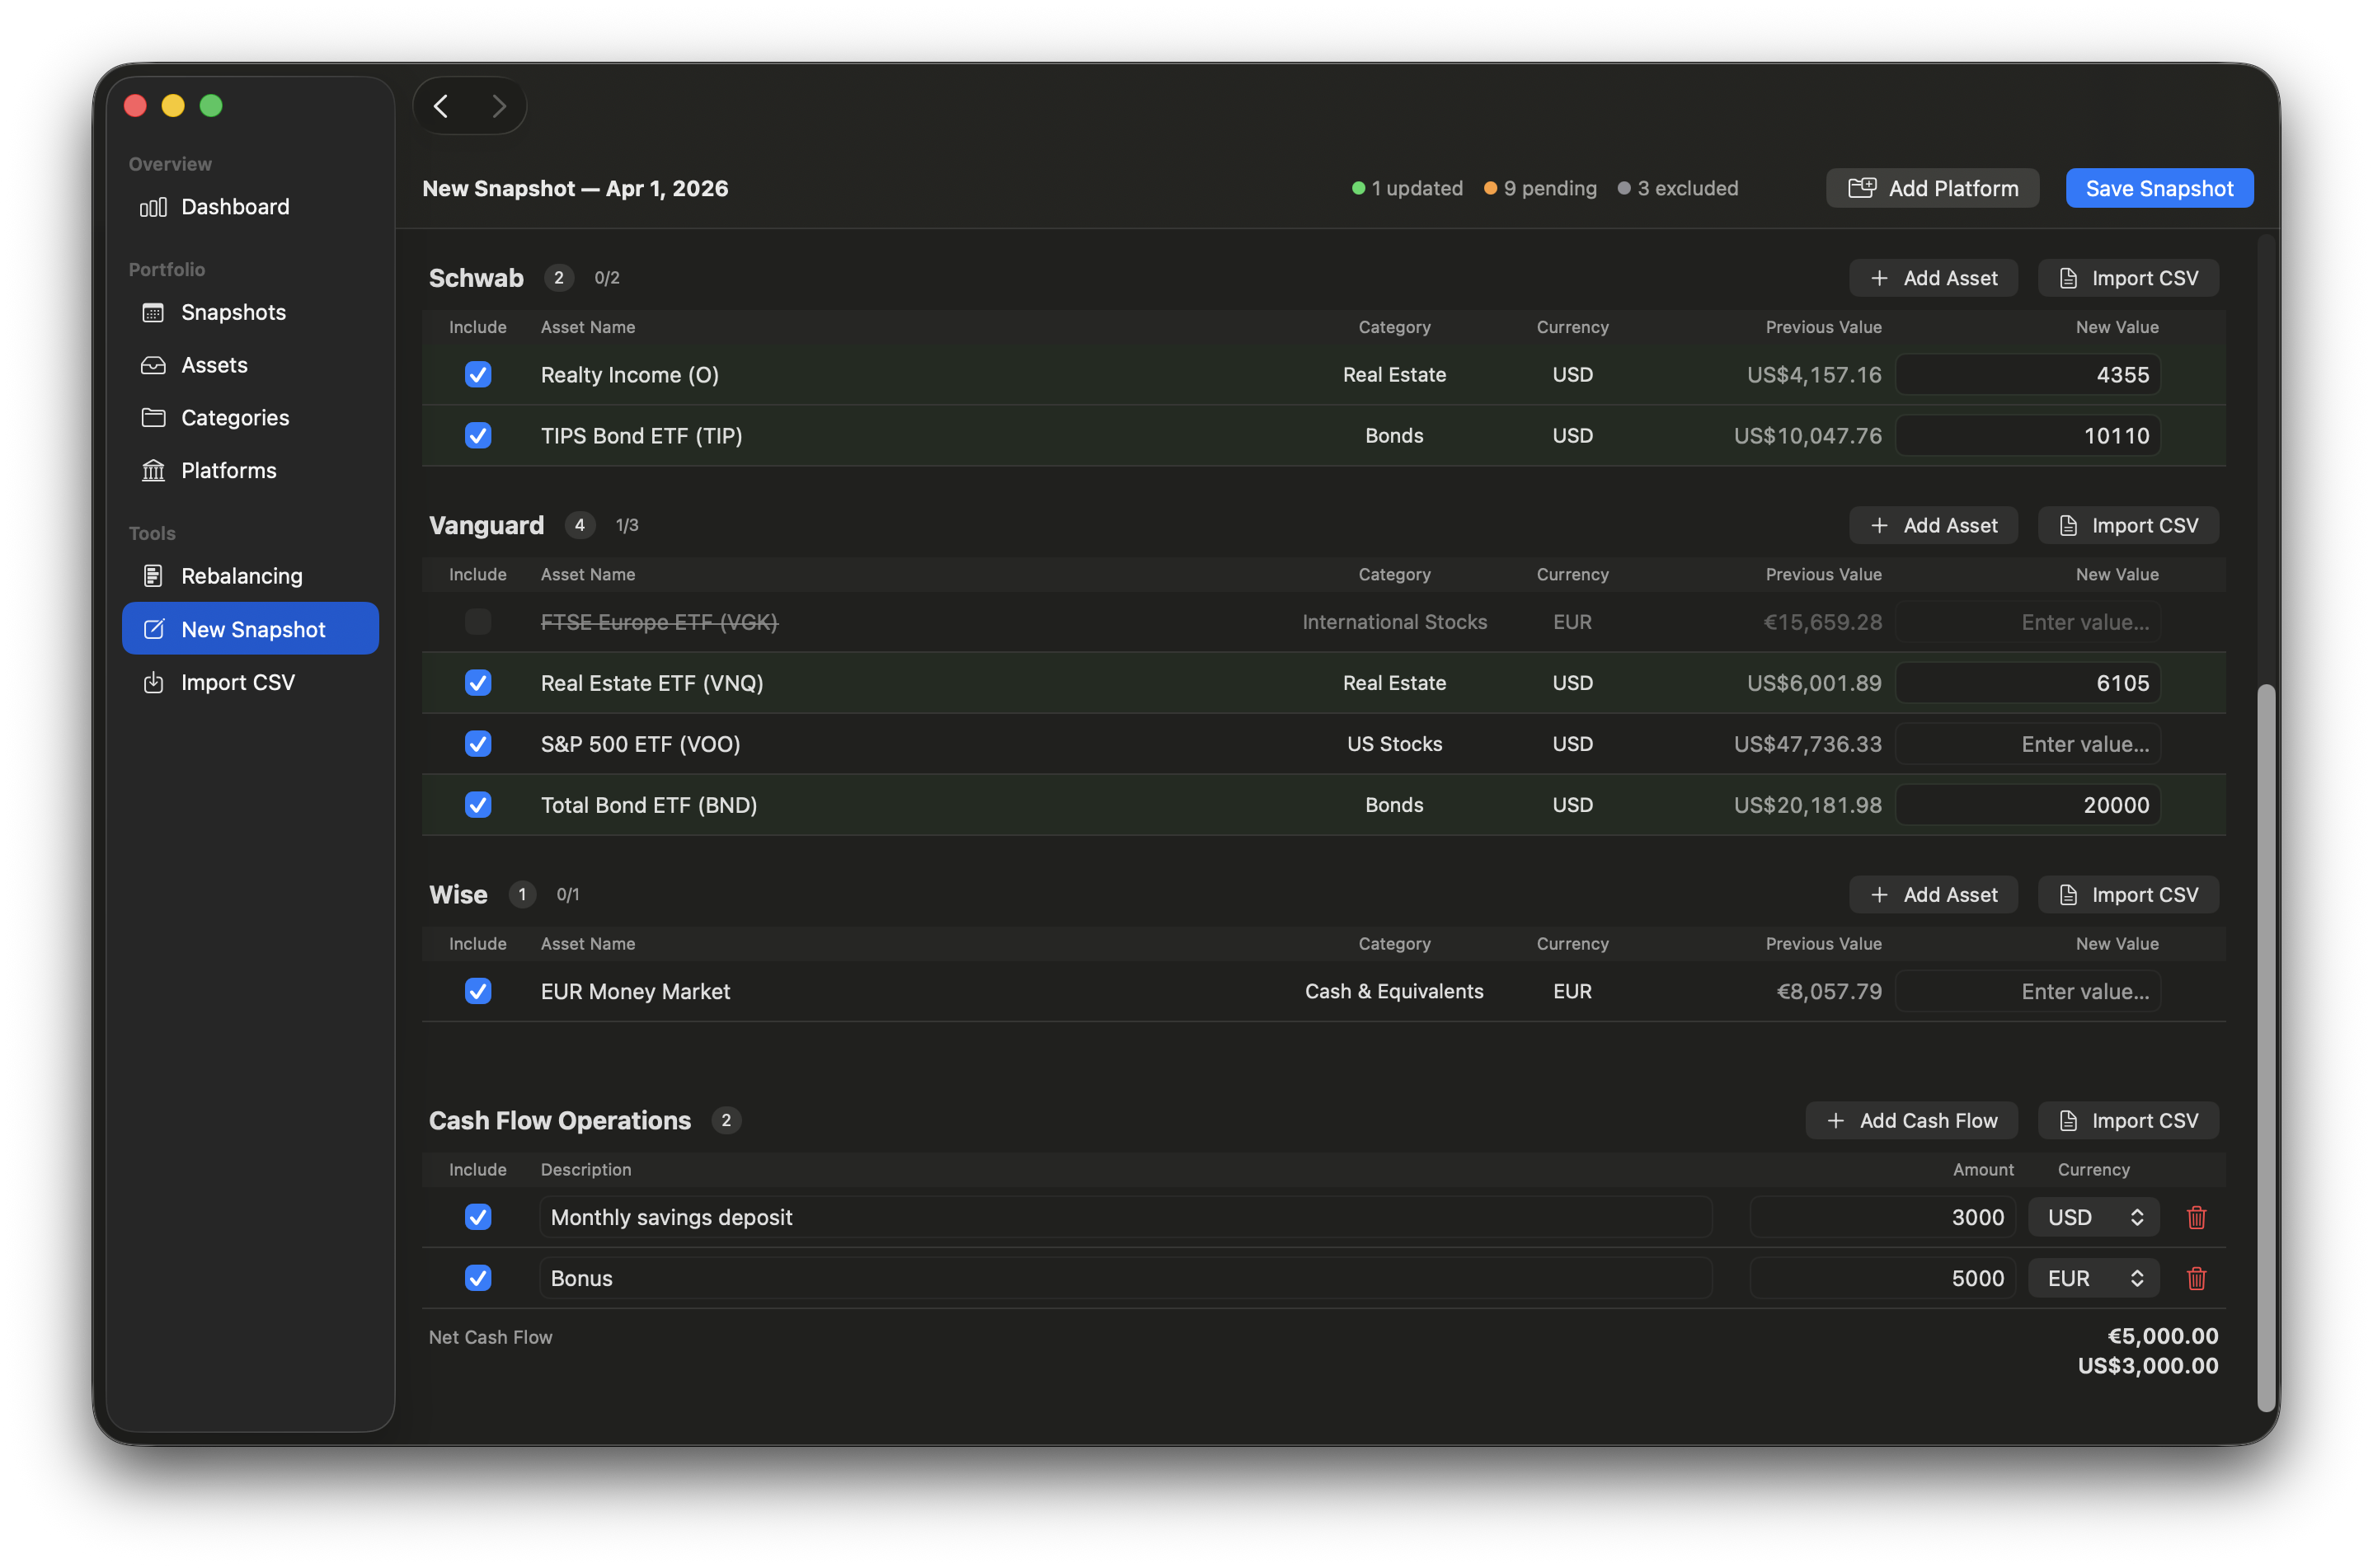
The Bulk Entry view opens with all assets from your most recent snapshot, grouped by platform — ready for you to update their values.
Tip
If this is your first snapshot, the view starts empty. Click Add Platform to begin adding assets.
The Bulk Entry Table
Assets are organized into collapsible platform sections, sorted alphabetically. Each platform header shows:
- Platform name (or "No Platform" for unassigned assets)
- Asset count
- Progress indicator (e.g., "3/5" means 3 out of 5 assets have been updated)
- Add Asset button for inline asset creation
- Import CSV button for per-platform CSV import
Columns
| Column | Description |
|---|---|
| Include | Checkbox to include or exclude the asset from the snapshot. Excluded assets are dimmed and won't be saved. |
| Asset Name | Read-only for existing assets. Editable for newly created assets, with a green "NEW" badge. |
| Category | Shows the asset's category. For new assets, a dropdown lets you pick an existing category or create a new one. |
| Currency | Read-only for existing assets. A dropdown picker for new assets. |
| Previous Value | The asset's value from your most recent prior snapshot. Hover to reveal a fill button that copies the value to the New Value field. Shows "—" if no prior value exists. |
| New Value | Enter the current market value here. Press Enter to move to the next row's value field. |
Row States
Rows are color-coded to help you track progress:
- Green background: The value has been entered or imported (updated).
- No highlight: The asset is included but hasn't been given a value yet (pending). It will be saved with a value of 0.
- Dimmed (50% opacity): The asset is excluded and won't be saved.
Progress Toolbar
The toolbar at the top shows real-time progress with colored indicators:
- Green: Updated assets (value entered or imported)
- Orange: Pending assets (included but no value yet)
- Gray: Excluded assets
Adding Assets and Platforms
Adding a New Asset
Click Add Asset in a platform's header to append a new row. Fill in:
- Asset Name — must be unique within the platform (case-insensitive)
- Category — pick from existing categories, or select "New Category…" to create one inline
- Currency — defaults to your main currency
New assets are marked with a green NEW badge. Use the trash icon to remove a new row if you change your mind.
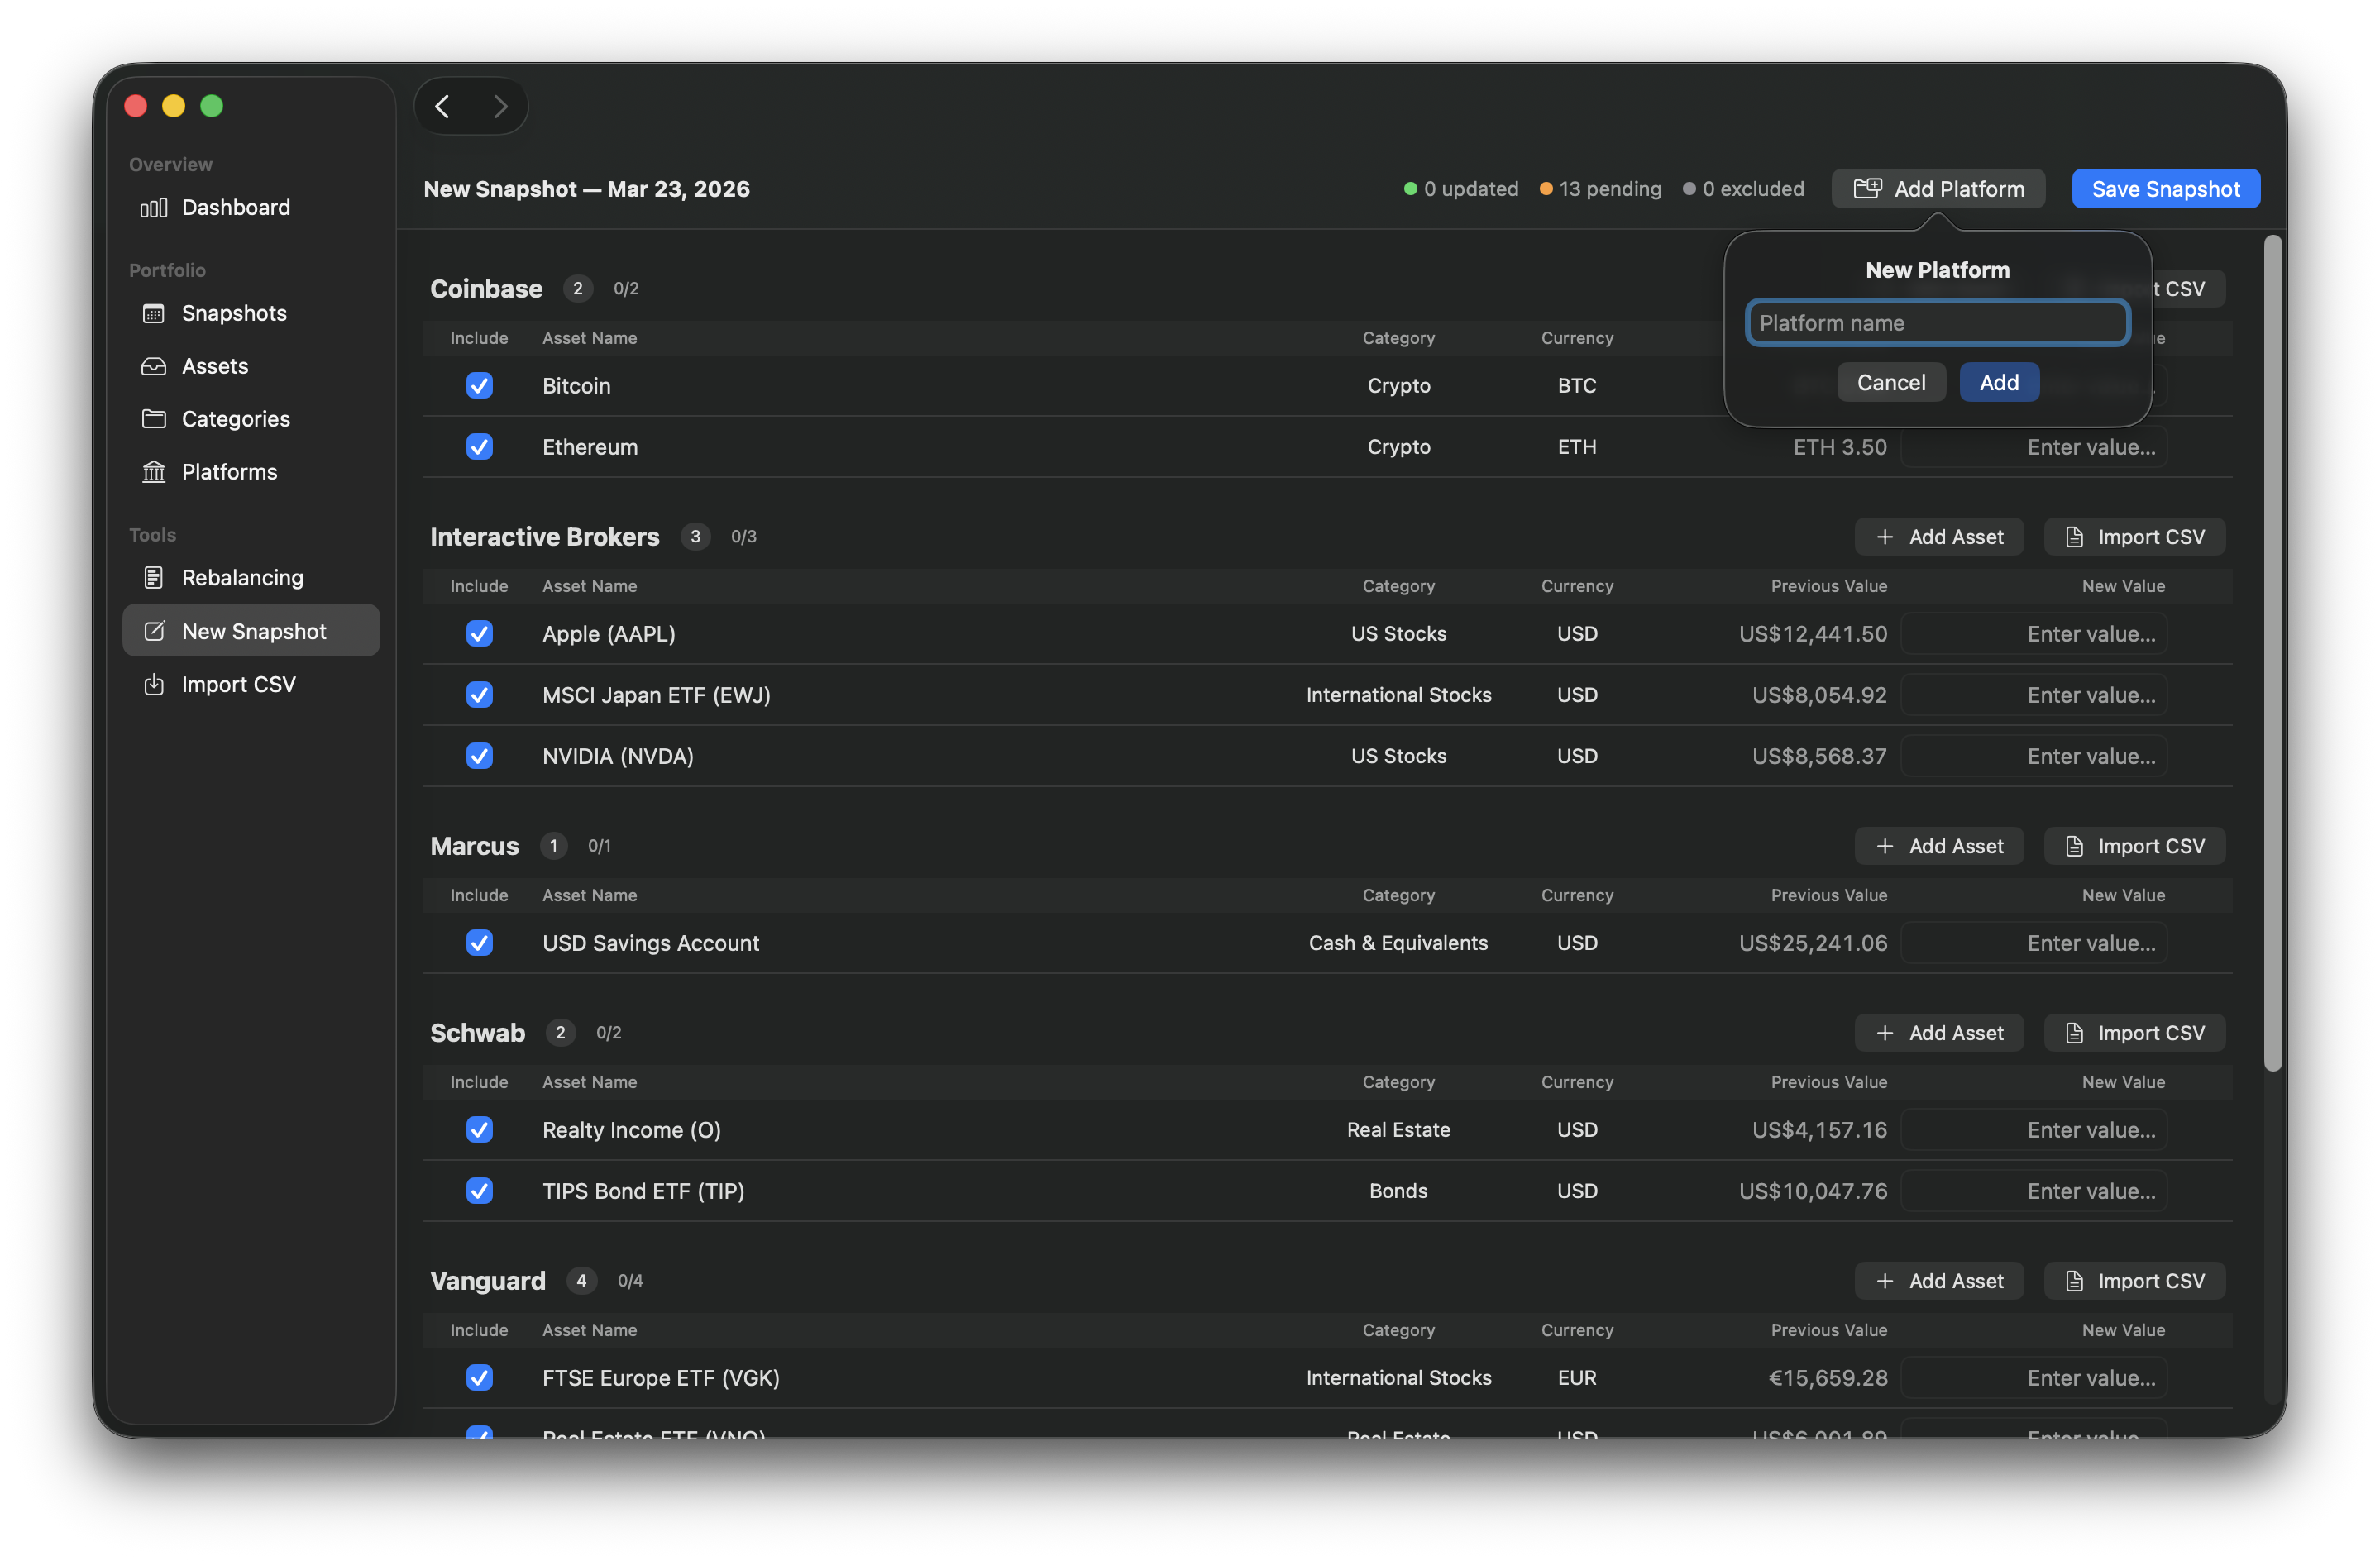
Adding a New Platform
Click Add Platform in the toolbar to open the new platform popover. Enter a unique platform name and click Add. A new platform section appears with one empty asset row, ready for editing.
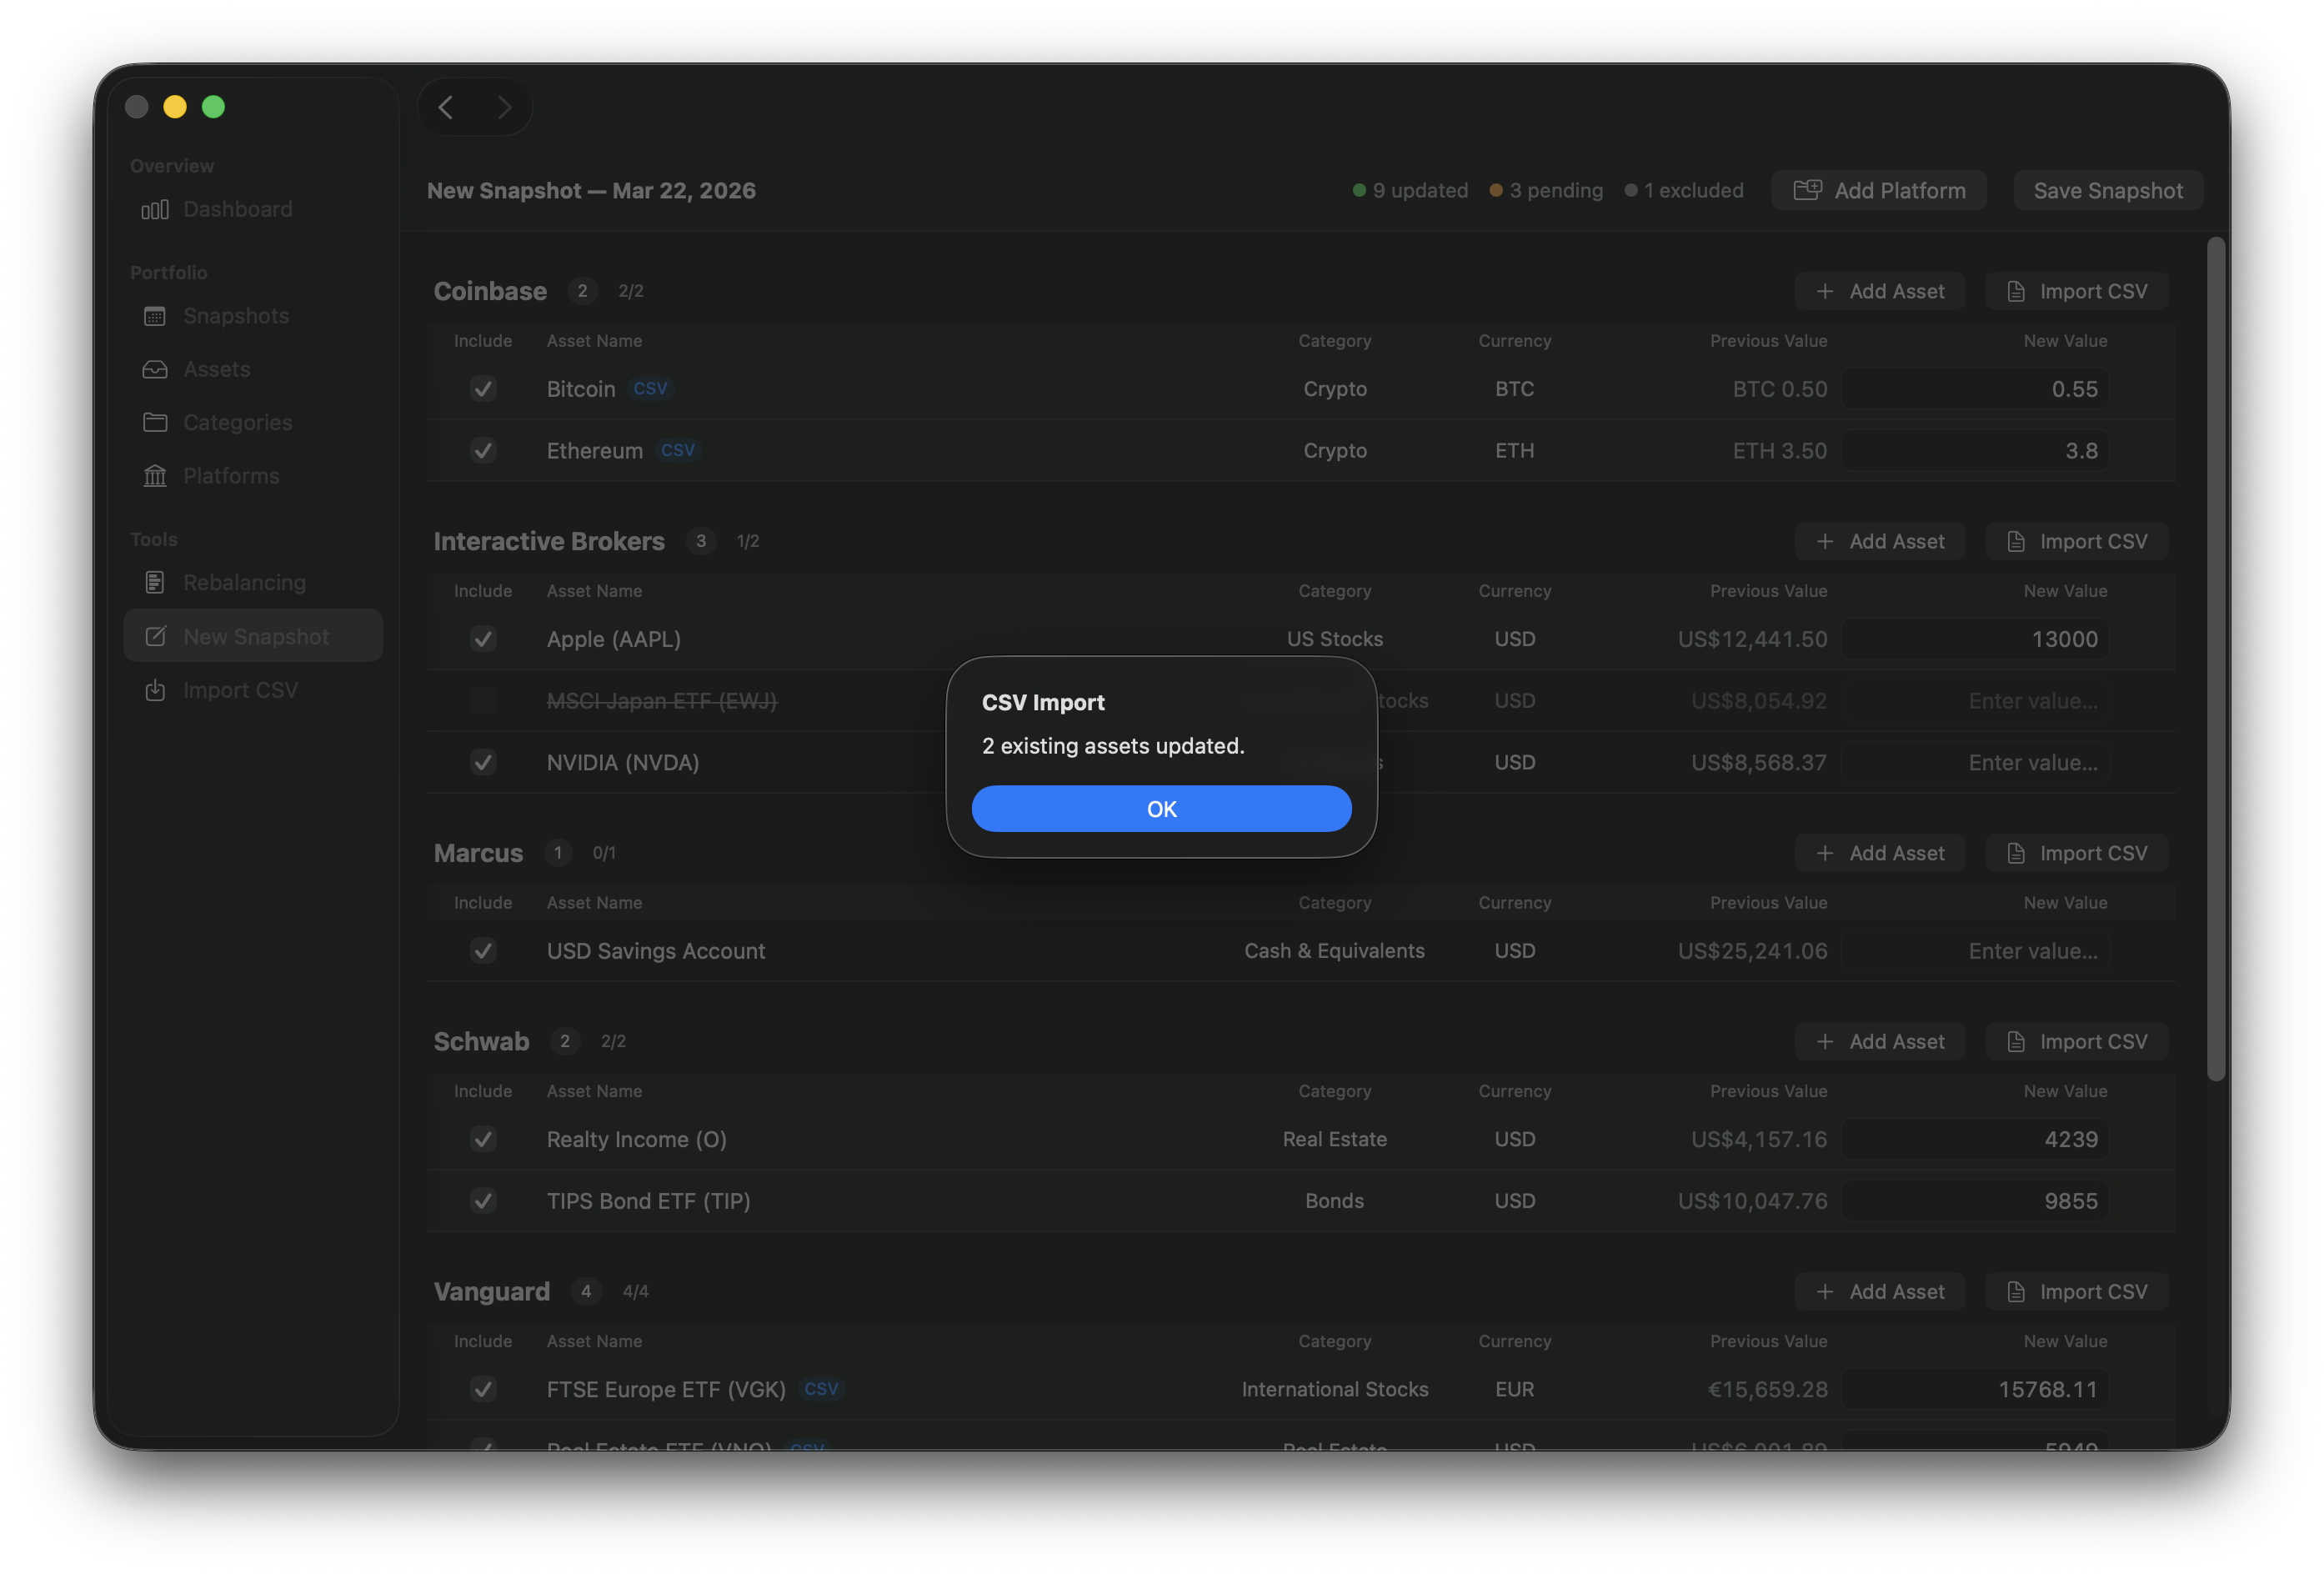
Per-Platform CSV Import
Each platform section has an Import CSV button that lets you import values from a CSV file directly into that platform group.
When you import:
- Matched assets (same name, case-insensitive) have their New Value updated with the CSV value and receive a blue CSV badge.
- Unmatched assets are added as new rows with a blue CSV badge.
If your CSV uses different column names, a column mapping sheet appears where you can assign each column to the correct field. The Platform option is not shown here since the platform is already determined by which section you're importing into. If the CSV headers already match the expected names, the mapping sheet is skipped. For more details on column mapping, see Import CSV — Column Mapping.
After the import, an alert summarizes the results — how many assets were updated, how many were added, and any rows that were skipped due to platform or currency mismatches.
Note
This per-platform CSV import is separate from the full Import CSV tool (Cmd+I). It's a quick way to pull in values for a single platform without leaving the Bulk Entry view.
Validation
The toolbar displays validation warnings that must be resolved before saving:
- Zero-value assets: "N assets have a value of 0. Exclude them or enter a non-zero value." Fields with a value of 0 are highlighted with a red border.
- Missing names: "Some new assets are missing a name." New asset rows must have a name before saving.
The Save Snapshot button is disabled until all validation issues are resolved.
Cash Flow Operations
Below the asset table, you'll find a Cash Flow Operations section where you can record deposits and withdrawals alongside your asset values — all in a single session.
Cash flows are portfolio-level (not grouped by platform) and start empty each time. They are not carried forward from the previous snapshot.
Adding Cash Flows
Click Add Cash Flow to append a new row — the description field is automatically focused so you can start typing immediately. Fill in:
- Description — a label for this cash flow (e.g., "Salary deposit", "Rent withdrawal"). Must be unique within the snapshot (case-insensitive). Press Enter to move to the amount field.
- Amount — positive for deposits, negative for withdrawals. Press Enter to move to the next row.
- Currency — defaults to your main currency.
Use the trash icon to remove a manually-added row. Use the Include toggle to exclude a row without deleting it.
Net Cash Flow Summary
Below the cash flow rows, a Net Cash Flow summary shows the total of all included rows' amounts. If your cash flows use multiple currencies, each currency's total is shown separately.
Cash Flow CSV Import
Click Import CSV in the cash flow section header to import cash flows from a CSV file. The expected columns are Description and Amount (required), plus an optional Currency column. If your CSV uses different column names, a column mapping sheet appears — same as with asset CSV import.
After the import, an alert summarizes how many cash flows were updated or added.
Note
Re-importing a CSV clears all previously imported cash flow rows before applying the new import.
Cash Flow Validation
The toolbar shows validation warnings for cash flow issues alongside asset warnings:
- Missing description: Cash flow rows must have a description.
- Missing amount: Cash flow rows must have an amount.
- Invalid amount: Amount text that can't be parsed as a number.
Duplicate descriptions are checked when you click Save Snapshot. If duplicates are found, the save is rejected with an error dialog.
Saving the Snapshot
When everything looks good, click Save Snapshot. If any included assets still have no value (pending), a confirmation dialog will ask whether you'd like to save them with a value of 0. You can always update these values later in the snapshot detail view.
Duplicate asset names within the same platform (case-insensitive) and duplicate cash flow descriptions are checked at save time. If duplicates are found, the save is rejected with an error dialog identifying the duplicate.
After saving, you're taken to the snapshot detail view where you can review the result or make further edits.
Zero-Value Warnings
Assets saved with a value of 0 are flagged throughout the app to remind you to update them:
- Snapshot detail view: A yellow warning icon appears next to each zero-value asset. Hover over it for details.
- Snapshot list: A yellow warning icon appears on any snapshot that contains zero-value assets.
See also
- Snapshots: Overview of snapshots and the snapshot detail view
- Import CSV: Full CSV import tool for bulk-importing assets and cash flows
- Assets: Managing individual assets
- Platforms: Managing platforms